Wednesday 30 July 2014

More New Stencils For the Gelli Plate

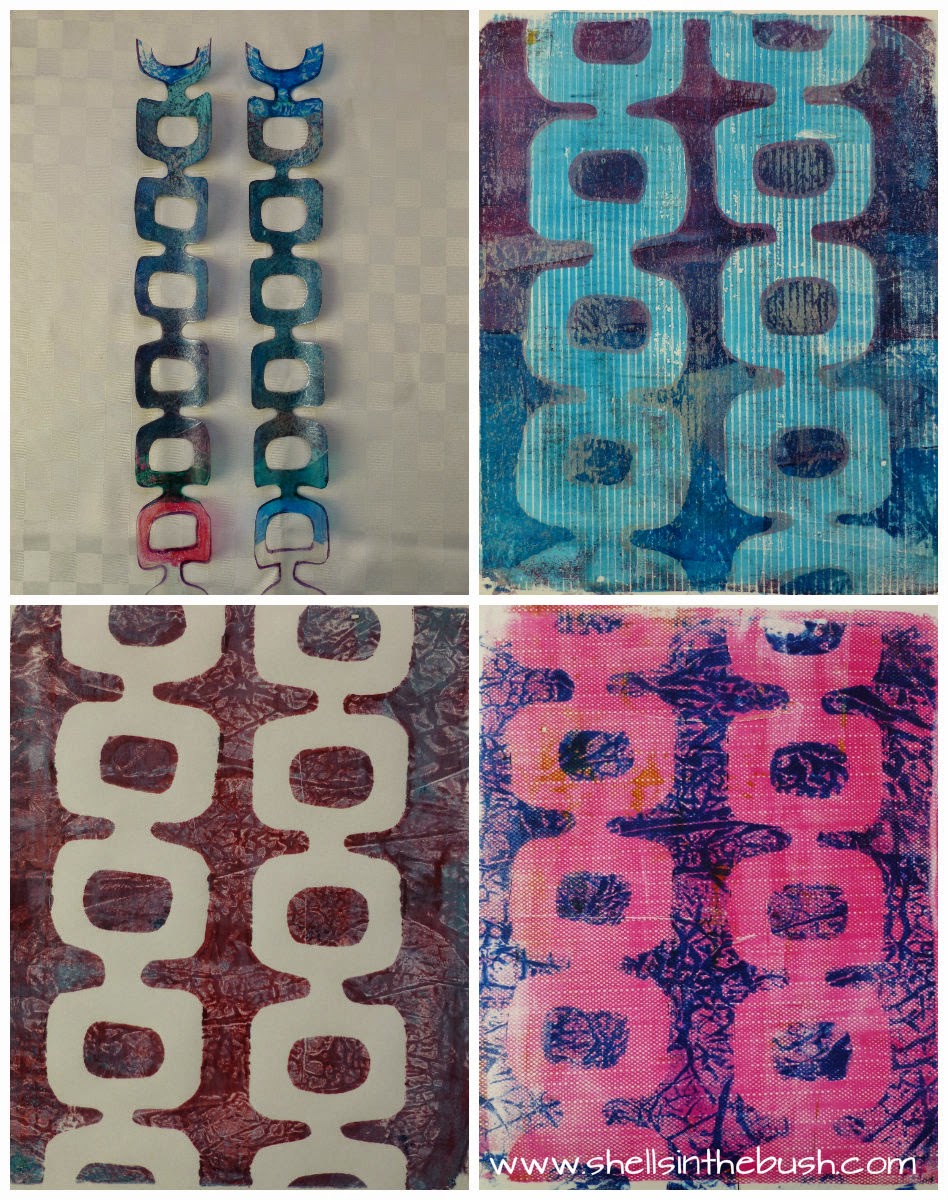
I've created three new stencils for my gelli plate. 


The roll of acetate was proving difficult to flatten so here's a few more tips:

Tip of the day No. 1: Do not try to flatten acetate roll by pouring boiling water over it - your stencil will buckle and you will cry.


Tip of the day No. 2: You can try to iron out the buckling and flatten the stencil but start off on the lowest heat and have a tea towel folded in half with the acetate stencil in the middle.


Tip of the day No. 3: Buy acetate sheets if they are available.  They may be more expensive than the roll but they are a better size but seriously all the bother and difficulty is not worth $1.  (The roll was $5 = 500mm x 550mm/20 x 22 inches and the sheets are $3 = A3 = 2 x A4 = 29.7 x 42.0cm, 11.69 x 16.53 inches. Its area is 0.125 square meters, or 0.15 square yards,1.35 square foot, 193.75 square inches.)

The previous stencil inspired me to create this fish one:


This stencil I had thought about but then found something I had in mind on Pinterest - so I made some changes and added a few more bridges.


What am I going to do with all these prints?  I'm going to package them up and sell them on Etsy! They'll be in the shop early next week, I need to create a few more to fill up the envelopes!

PS  Do you love creating gelli prints?  Want a place to discuss gelli printing?  To show off your work?  Share your ideas? Discuss the pros and cons of different paints/paper/plates/tools etc?  Get some great ideas on what to do with the thousands of prints you have created?
Inspire and be inspired as a part of the Gelatin Printing Enthusiasts Facebook Group. I would love for you to join me there.


Sunday 27 July 2014

Gelli Prints With New Stencil


Gelli Print Collage.
 I created a new stencil with a 60's vibe. I first used a cereal box but went out and bought some acetate whilst down town today.


Tip of the day with acetate - if you can buy it in the sheets then don't get a roll of it as it will curl and make placing on the gelli plate difficult.  Tip number 2 - make sure you have only smooth edges after cutting, check for pointy/spiky bits as they are not gelli plate friendly.


Round gelli prints too....

That was fun, I think I'll have to come with another one. Have you ever made stencils/masks?  I'd love to see them so let me know.

PS  Do you love creating gelli prints?  Want a place to discuss gelli printing?  To show off your work?  Share your ideas? Discuss the pros and cons of different paints/paper/plates/tools etc?  Get some great ideas on what to do with the thousands of prints you have created?
Inspire and be inspired as a part of the Gelatin Printing Enthusiasts Facebook Group. I would love for you to join me there.


Friday 25 July 2014

Gelli Plate Playtime


I was inspired by this Dina Wakely stencil to create my own and had some fun with it.


I bought some cheap cookie cutters and used them to create patterns on the gelli plate - I used some of the prints for the stencil above.


And some other prints I created this week, some on brown paper too:


And some ghost prints from feather stencils I received from Sarah at Rainbow Ghecko Gallery:


Sunday 20 July 2014

Weekend Wanderings

A few photos from our weekend trip to visit friends on their farm about 3 hours and 300kms/186 miles away in the Wheatbelt of Western Australia.  They have a wheat farm so there are no cute baby farm animal pics, more on the road pics.

Saturday afternoon - Salmon Gum Trees (I think).

Sunday afternoon - on the way home - wheat fields, Red Morrell gum trees, Dowerin Tin Dogs, and dark grey clouds and sunshine.


How was your weekend?  Hope it was a good one!

Thursday 17 July 2014

The winner is...

The winner of one of my heart pendants from the Alice - The Mad Hatter giveaway is...

Number 4 is Ain't No Ninny!!! Congratulations!!  I'll try to get in touch with you to let you know!!


I'm looking forward to next month's Blog Hop!  See you then!

Monday 14 July 2014

ShellsintheBush Etsy Shop

I have finally opened an Etsy shop!!!!

I am selling my heart pendants and Gelli Print Packages which have a variety of gelli print papers in them.


These packages are great for art journaling, collages and mixed media, making cards, ATC's, book marks and tags...
I will be adding some of my collages and gelli prints over the next few days!

PS  Do you love creating gelli prints?  Want a place to discuss gelli printing?  To show off your work?  Share your ideas? Discuss the pros and cons of different paints/paper/plates/tools etc?  Get some great ideas on what to do with the thousands of prints you have created?
Inspire and be inspired as a part of the Gelatin Printing Enthusiasts Facebook Group. I would love for you to join me there.


Thursday 10 July 2014

Alice - The Mad Hatter

For the Blog Hop Club our July theme is Faces.


  Guada describes it just how I feel too - "For me painting faces it´s just the perfect mix between paradise and challenge ♥ it took me some time to achieve portraits I like and I´m still far away from being where I want to be but I enjoy the process so so much!" 

I found a picture on Pinterest to inspire my hat for my girl - it's a Mad Hatter hat so that is why I've named her Alice - the Mad Hatter. 

Here is the link to my Steller eBook with evolution pics.

Materials I used:

Watercolour paper
Graphite Pencils
Tracing paper
Scissors
Caran D'Ache Neocolor II
Gelli prints - phalo blue, turquiose green, alizarin crimson, purple, white.
Gel medium
Acrylic paints - gold, burnt sienna, yellow ochre, white and black.

Here are my evolution and how to photos:

1. I drew my face with hat and clothes.
2. Traced around my face, hat and clothes.
3. Traced around my face.


4. Coloured in my face with the Caran D'Ache Neocolor II watercolour crayons.


5. I cut out the face and neck area from the tracing paper and covered the face with it using Blu-Tac to hold it down. Use the paper as a mask from the paint.
6. I applied paint to my gelli plate, phalo blue, and then put some scrunched up paper on for texture.
7. Then I placed my girl onto the gelli plate - scary moment.
8. Then I tore my paper taking it off the plate!!!  Aargh!!! So do this step carefully and straight away - no taking photos of a piece of paper on your gelli plate.


9/10. Our secondary theme for this month was the following colours - blue green and red violet - so I created some gelli prints using these colours for the hat and clothes.
11/12. Cut out the hat and clothes from the tracing paper to use as a template and place in the best postion on the print. Trace around with a pencil then cut them out.


13. Use the gel medium to glue the gelli prints onto the girl.
14. I used gold paint to outline the hat and give it a ribbon edge.  I also found the background colour too dark, especially on the left of the painting and this helped to differentiate between the background and the hat.  I should have used a light blue for the background to make the hat stand out.  I did add a wash of yellow to fill in the white and give the background a green tinge.
15. I painted in the hair - always a scary moment for me too.


There you go, that's how I do my girls....She is for sale along with 3 of my other girls as part of an Art Sale for Nicole's Cause - $50 will go to the cause and $10 will cover postage. Bargain!!

Now for the heart pendant giveaway - please leave a comment below and I will choose a winner next Thursday. 


There are more chances to win amazing prizes - to enter you need to visit and comment on the following artists' blogs on the scheduled days:
 I look forward to the Blog Hop Club next month - I wonder what the theme will be?


PS  Do you love creating gelli prints?  Want a place to discuss gelli printing?  To show off your work?  Share your ideas? Discuss the pros and cons of different paints/paper/plates/tools etc?  Get some great ideas on what to do with the thousands of prints you have created?
Inspire and be inspired as a part of the Gelatin Printing Enthusiasts Facebook Group. I would love for you to join me there.


Tuesday 8 July 2014

Sneak Peek - Blog Hop Club

Here's a sneak peek of my next contribution for Guada's Blog Hop Club.  The full picture, evolution pics and to see how I made her then check back on Thursday.

Alice - The Mad Hatter


Alice will be for sale along with 3 of my other girls as part of an Art Sale for Nicole's Cause - $50 will go to the cause and $10 will cover postage. Bargain!!


See you on the Thursday for the big reveal and details of another heart pendant giveaway!

Here's the bloghop schedule: